
If you have ever finished a drawing, flipped to a fresh page, and realized your character suddenly looks like a stranger, you already know why learning how to draw the same character consistently matters. Character consistency is what lets a comic reader recognize your protagonist across 200 pages, lets an animator reuse a model sheet across 24 episodes, and lets your character design portfolio read as one cohesive body of work instead of a pile of unrelated sketches.
In this guide I will walk you through the exact methods professional illustrators, comic artists, and animators use to keep their characters recognizable. We will cover shape language, turnaround sheets, iconic features, the Loomis method for multiple angles, modern digital workflows, and the small daily habits that turn a drifting sketchbook into a consistent cast. By the end you will have a repeatable system, not just a vague feeling, for how to draw the same character consistently from any angle, in any pose, in any expression.
Table of Contents
Key Steps for Character Consistency
The fastest way to draw a character consistently is to combine a simple shape foundation, a finished turnaround model sheet, two or three anchored features, and regular repetition. If you follow these seven steps in order, your character will start to feel like the same person from one drawing to the next.
- Build the head and body from basic 3D shapes. Sphere for the skull, cylinder for the neck, capsule for the torso. This forces you to think of your character as a volume that turns in space, not a flat sticker.
- Pick a dominant shape language. Decide whether your character reads as circles, squares, triangles, or a mix, and apply it to the head, hair, eyes, and clothing silhouette. Disney uses circles for soft characters and sharp triangles for villains.
- Lock down two to three iconic features. Big round glasses, a chipped tooth, a cowlick, a scar. These act as visual anchors your reader’s eye grabs onto, even when the proportions wobble.
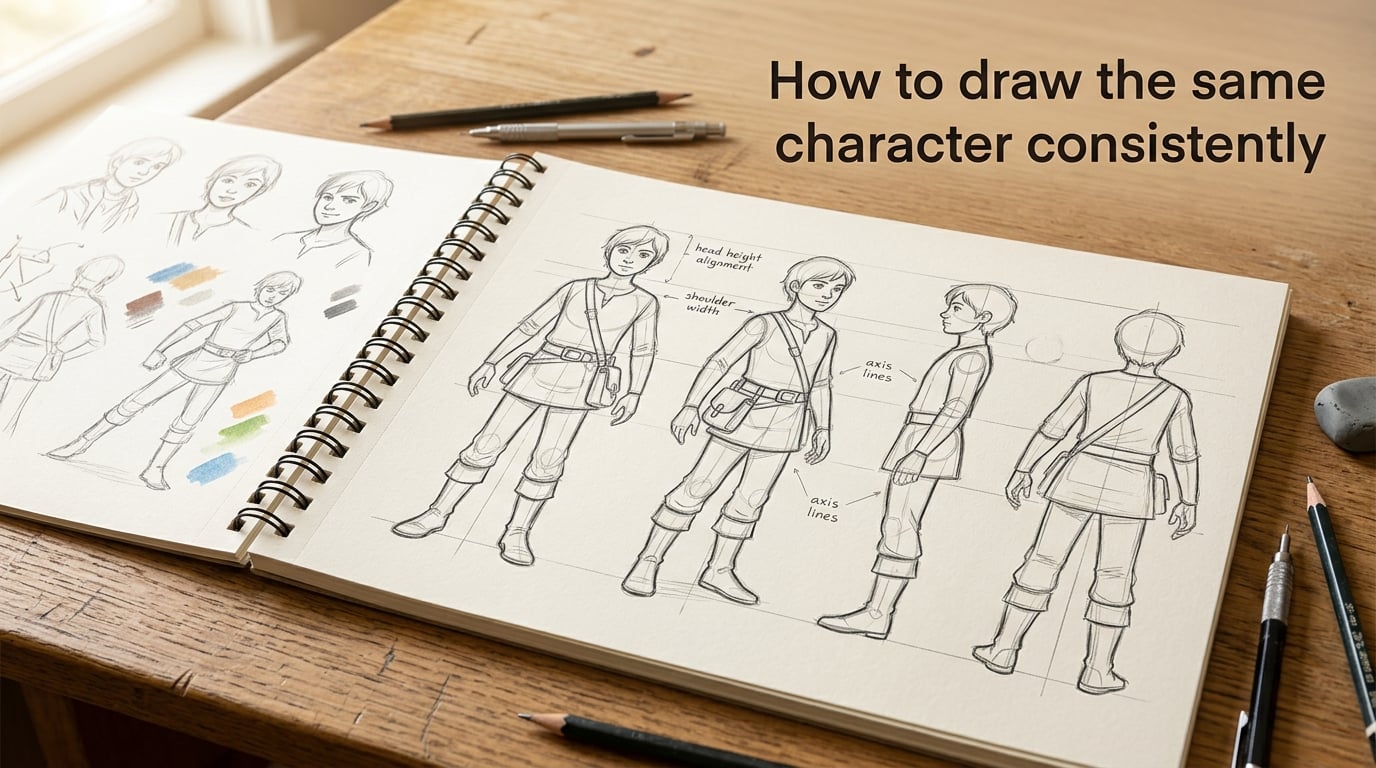
- Create a turnaround model sheet. Draw your character from the front, three-quarter, side, and back. Measure the eye-to-nose and nose-to-chin distances once and reuse them.
- Run the silhouette test. Fill your character in solid black. If you cannot tell who it is from the outline alone, the design is not iconic enough yet.
- Use real reference and your own old drawings. Keep a folder of your finished pieces. Copying your own homework is faster and more accurate than redrawing from memory every time.
- Practice with expression and pose sheets. Drawing the same face laughing, crying, angry, and surprised locks the features into muscle memory faster than any tutorial video.
Why Your Characters Drift Off-Model
Most artists do not have a skill problem. They have a system problem. When you draw a character from imagination without a reference, your brain quietly averages every face you have ever drawn. Comic artist Sloane Leong calls this generification, where the unique features of your hero slowly smooth out until they look like a generic pretty anime person rather than the specific protagonist you designed.
The fix is not talent. It is anchors. You need external reference points, your own model sheet, your own past work, or a 3D blockout, that pull your hand back toward the specific features you chose on day one. Without anchors, every drawing becomes a fresh invention.
This is the same reason Pixar animators keep a character bible for every film and why the Loomis method has survived 100 years of art education. The technique is less important than the discipline of measuring before you commit.
Work in Simple Shapes and Shape Language
Shape language is the single biggest predictor of how to draw the same character consistently across a comic or animation. The idea is simple: every design choice communicates a feeling through its underlying shape. Circles feel friendly, soft, and approachable. Squares feel stable, grounded, and serious. Triangles feel sharp, dangerous, and energetic.
Pick a dominant shape for your character and let it echo through the whole design. A round-headed cartoon character should have circular eyes, circular cheeks, and curved shoulders. A square-jawed hero needs angular cheekbones and straight shoulders. Once the shape language is consistent, the silhouette becomes recognizable even before any details are added.
When I started testing this with my own characters, the difference showed up within a week. Drawing the head as a sphere first, the jaw as a smaller cube attached at an angle, and the nose as a tiny pyramid kept my faces on-model far better than jumping straight to finished line art. The shapes are scaffolding. They hold the character in place.
Build a Turnaround and Model Sheet
A turnaround sheet is your character’s official ID photo. It shows them from the front, three-quarter, side, and back, usually at the same scale, with construction lines and measurements. Animation studios call this a model sheet. Comic artists call it a character reference sheet. The name does not matter. The function does.
To build one that actually helps you stay consistent, follow these steps:
- Draw a vertical centerline through the head and mark the brow line, eye line, nose line, and chin line.
- Plot the eye distance and nose width as a fraction of the head. Most anime and cartoon heads have eyes one eye-width apart.
- Sketch the front view, then rotate the same head into a three-quarter view by shifting the centerline to the side of the head.
- Draw the pure profile using the Loomis sphere-and-plane method so the proportions stay matched.
- Add a back view showing the hair volume and any rear details like capes, wings, or backpack straps.
- Include three to four expression thumbnails and one full-body pose so you can reuse the same proportions later.
Once the sheet is finished, print it, pin it above your desk, and pull it up every time you start a new drawing. Comic artist Nilah Magruder has shared that she keeps her own turnarounds taped to her monitor for exactly this reason.
Pin Down Iconic Features as Visual Anchors
Every consistent character has two or three features that the audience immediately associates with them. Mickey Mouse has the ears. Sailor Moon has the odango buns and the crescent on her forehead. Tintin has the tuft of hair that never quite lies flat. These are not just decorations. They are visual anchors that hold the character together when the angle or pose changes.
Choose anchors that survive foreshortening. A tiny beauty mark on the cheek still works in profile. A large necklace still reads from the back. A specific hair cowlick is recognizable at any angle because it breaks the silhouette.
The eye-nose-mouth triad is the most important measurement to lock down. Once you decide that your character’s eyes sit exactly one eye-width apart and the nose ends halfway between the eyes and the chin, you can apply that ratio to every angle. This is the heart of how to draw the same character consistently from different angles without redrawing from scratch each time.
Use Real-Life Reference and Your Own Old Drawings
Many beginners treat reference as cheating. Working artists treat it as mandatory. Animators at studios like Warner Bros and Cartoon Network keep photo reference pinned to their desks for the entire production of a show. There is no shame in looking.
Build an analogue collection, which is a folder of reference photos, magazine clippings, and your own finished character art that captures the vibe you want. Never rely on a single reference. Multiple angles of multiple people give your brain a wider range of believable features to pull from.
Equally important is copying your own homework. Pull up a finished drawing of your character and trace over it loosely while you draw the new pose. You are not tracing for the final piece. You are training your hand to remember the exact curve of the brow, the angle of the nose, the width of the jaw. Over time you will need the reference less and less.
Draw Your Character From Multiple Angles
Most characters go off-model the moment you rotate them out of a three-quarter view, because artists draw the front view from imagination and then try to guess the side view. The Loomis method solves this by treating the head as a sphere with a flat plane cut through the middle for the face. From there, every angle is just a rotation of the same sphere.
To draw your character at any angle:
- Start with a sphere and a horizontal brow line. Mark the centerline of the face.
- When turning the head, slide the centerline to one side of the sphere. This automatically foreshortens the far side of the face.
- Drop the jaw plane at the same angle as the brow line. The jaw never floats independently of the skull.
- Plot the eye line one head-radius down from the top of the sphere. This measurement never changes.
- Reapply your two or three iconic features using the same proportions you locked in on your model sheet.
Forum artists on r/learnart regularly credit the Loomis method as the single biggest unlock for drawing characters from imagination consistently. It works in anime, cartoon, and realistic styles alike because the underlying geometry is the same.
Avoiding Same Face Syndrome Across a Cast
Same face syndrome is what happens when every character in your webcomic or portfolio looks like a slight variation of the same person. It is usually a sign that you are drawing from a single mental template instead of designing each character with deliberate differences.
To break the syndrome, give each cast member a different combination of shape language, anchor features, and proportion. One character might have a round face, sharp triangular eyes, and a long neck. Another might have a square jaw, circular eyes, and a stocky build. As soon as you differentiate two or three of those variables per character, the cast reads as distinct people.
A quick exercise that catches same face syndrome early is the thumbnail test. Shrink all your character designs to thumbnail size, under two centimeters tall. If they still look unique, your design language is strong. If they blur into the same face, the silhouettes and anchors need more work.
Silhouette Test and Style Consistency
The silhouette test is a simple filter that catches weak character design. Fill your character with solid black, remove all interior lines, and shrink the image to thumbnail size. A strong character is still recognizable at that scale. A weak character turns into a generic blob.
This is also the moment to make intentional style decisions. If your cast is realistic, they need realistic proportions and consistent rendering style. If they are cartoon, exaggerate the head size and simplify the anatomy. Mixing realistic faces with chibi bodies is a stylistic choice, but the choice has to be the same for every character in the project.
Style consistency is one of the most underrated parts of how to draw the same character consistently, because the eye notices when one panel is rendered tighter than another. Pick a level of finish and apply it across the whole work, even when you are tired.
Practice Repetition and Expression Sheets
Muscle memory is built by repetition, not by watching tutorials. Artists who draw the same character on a schedule, even fifteen minutes a day, will outpace artists who binge-watch videos once a month. The hand learns faster than the brain, and the hand needs volume.
Expression sheets are the most efficient practice tool because they force you to draw the same face over and over with subtle changes. Sketch your character smiling, frowning, surprised, angry, scared, laughing, crying, and neutral. The features that do not change between expressions, like the eye distance and the nose length, become locked into your hand.
Pose sheets do the same thing for the body. Draw your character standing, walking, running, sitting, falling, fighting, and hugging. After ten sheets you will stop having to think about where the shoulders go in a three-quarter pose. It will just happen.
Modern Tools and Workflows for 2026
The core techniques have not changed in a century, but the tools have. In 2026 there are more options than ever for keeping characters consistent, from old-school to cutting-edge.
Digital workflows in Procreate, Clip Studio Paint, and Photoshop now offer built-in symmetry, line stabilization, and layer-locking that help keep line weight even across an entire comic page. The Photoshop flip trick, where you mirror your drawing to catch lopsided faces, is a thirty-second habit that catches errors a fresh eye never would.
3D modeling has become a serious option for character consistency. Tools like Blender, Nomad Sculpt, and even the free browser-based VRoid Studio let you build a quick blockout of your character, rotate it to any angle, and use it as a live reference. James Gurney famously sculpted clay maquettes of his Dinotopia creatures for this exact reason.
AI-assisted consistency is the newest frontier. Modern tools let you lock a character’s face into a reference pose, then generate the same character in dozens of new angles while preserving the features. Used carefully, these tools are a force multiplier for indie comic creators working without an art team. Used carelessly, they flatten character design into the same generic AI look, which is why the model sheet and anchor features still matter even with AI in the mix.
Color palette consistency is another 2026 workflow that older guides skip. Pick three to five core colors for each character and reuse them exactly. A simple palette swatch saved in your project folder does more for visual consistency than any anatomy tutorial.
Frequently Asked Questions
What is the 70/30 rule in drawing?
The 70/30 rule in drawing means that 70% of a character’s design should stay consistent across every drawing, while 30% can flex for expression, pose, or storytelling. It is a sanity check that prevents you from over-perfecting minor details that readers will not notice anyway.
What is the 70/30 rule in character design?
In character design, the 70/30 rule states that roughly 70% of a character’s silhouette, proportions, and anchor features should remain stable, while the remaining 30% can shift for mood, angle, and action. This keeps the character recognizable without freezing them into a stiff pose.
What is the 50% rule in art?
The 50% rule in art suggests that when tracing, referencing, or copying from another source, an artist should aim to transform at least half of the reference through their own interpretation. It is a guideline for balancing learning from masters with developing a personal voice.
What is the 80/20 rule in art?
The 80/20 rule, also called the Pareto principle, suggests that 80% of your character consistency results come from 20% of your effort, mainly the model sheet, anchor features, and shape language. Mastering those few high-leverage habits produces most of the consistency you will ever need.
How to keep a character consistent in drawing?
Keep a character consistent by building a turnaround model sheet, locking two or three iconic features, drawing in basic 3D shapes, and referencing the same sheet every time you start a new piece. Practice with expression sheets until the proportions live in your muscle memory.
How to draw the same character from different angles?
Draw the same character from different angles by starting with a Loomis sphere, sliding the centerline to one side to create foreshortening, then redrawing the eyes, nose, and mouth using the same measurements from your model sheet. Practice the front, side, three-quarter, and back view until each one feels natural.
How long does it take to draw a character consistently?
Most artists notice real consistency improvements within two to four weeks of daily fifteen-minute practice with expression sheets. Full mastery, where the character can be drawn convincingly from imagination in any pose, typically takes several months of regular sketching.
Final Thoughts on Drawing the Same Character Consistently
Learning how to draw the same character consistently is less about talent and more about installing a system. Pick the shape language, build the turnaround sheet, lock the anchor features, and practice the same face on a schedule. Do those four things and your characters will start to feel like people your readers actually know.
Your next step is simple. Pick one original character you have drawn at least three times, build a turnaround model sheet this week, and use it as the reference for the next ten drawings. By the end of the month you will have a body of work that finally looks like the same character, drawn by an artist who is finally drawing them on purpose.