
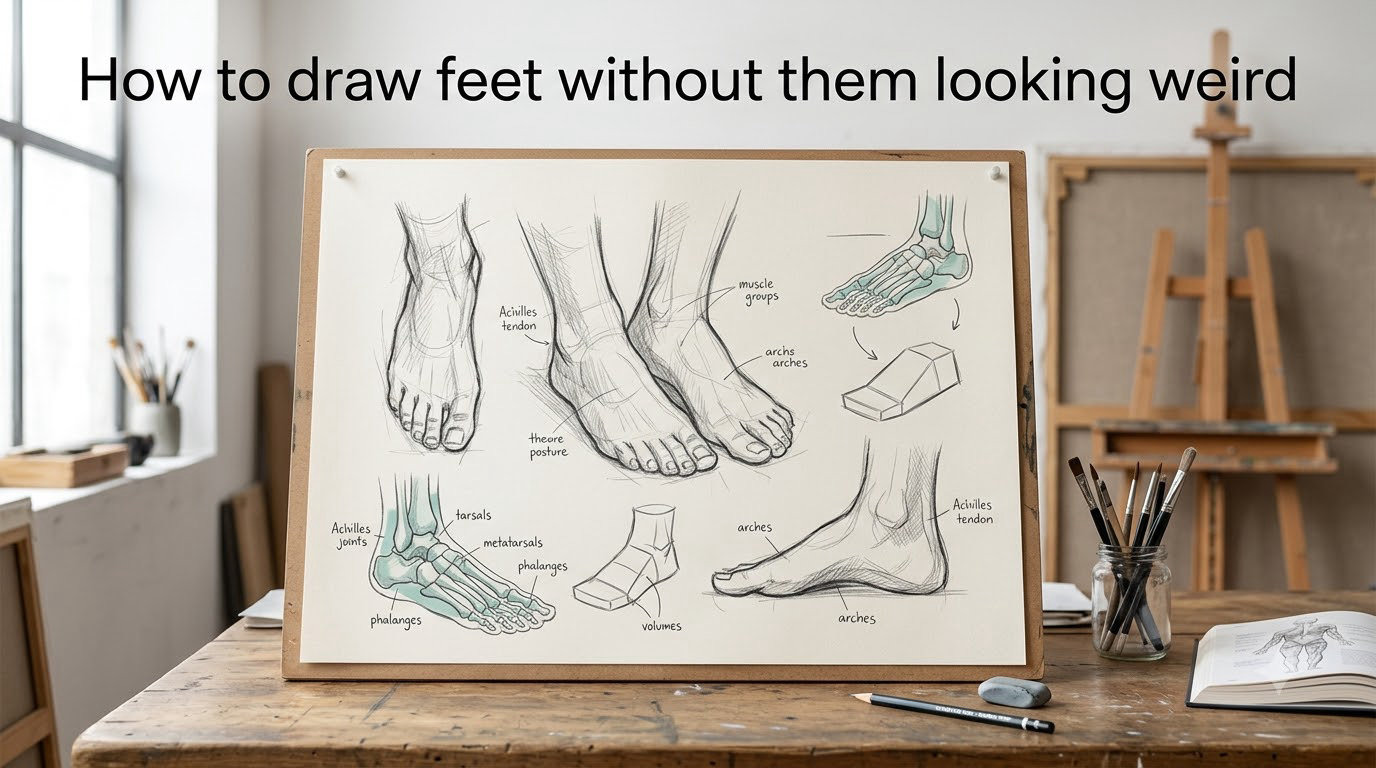
Learning how to draw feet without them looking weird is one of the biggest frustrations for artists at every level. If you’ve ever finished a figure drawing only to realize the feet look like deformed blobs, you’re not alone. Feet are notoriously tricky — but there’s a straightforward system that makes them much easier to get right.
In this guide, I’ll walk you through exactly why feet drawings tend to go wrong, then give you a simple shapes method and step-by-step process you can use every time. By the end, you’ll have a reliable framework for drawing feet from any angle without the weirdness.
Table of Contents
Why Do Your Feet Drawings Look Weird?
Before jumping into techniques, it helps to understand what’s actually going wrong. Most artists struggle with feet for a few specific reasons — and recognizing these problems is the first step toward fixing them.
The biggest issue is trying to draw what you think a foot looks like instead of what it actually looks like. Your brain has a simplified idea of “foot” that doesn’t match reality. When you draw from that mental shortcut, you end up with shapes that feel off.
Here are the most common problems:
- Drawing the foot as one big shape — Feet have distinct sections (heel, midfoot, toes) with different proportions and angles. Treating them as a single form loses all the structure.
- Toes that look wrong — Beginners either make toes too big, too evenly spaced, or pointing in the wrong direction. The big toe is especially tricky because it’s angled differently than you’d expect.
- Ignoring the arch — The medial (inner) side of the foot has a visible arch. Skipping this makes feet look flat and lifeless.
- Ankle placement — The ankle isn’t centered on top of the foot. The two ankle bones (tibia and fibula) sit at different heights, and missing this detail throws off the whole shape.
- Too much detail too soon — Jumping to drawing individual toes before establishing the overall shape is like decorating a house before building the foundation.
Reddit’s r/learntodraw community puts it bluntly: “Keep those pencil strokes light till you got 100% confidence, build with simple shapes.” This advice comes up again and again because it works.
Understanding Foot Anatomy (The Quick Version)
You don’t need to memorize all 26 bones in the human foot. But knowing a few key structures will make your drawings dramatically better.
The foot has three main sections that matter for drawing:
The heel and ankle complex. This is where the two leg bones — the tibia (inner) and fibula (outer) — connect to the foot. The tibia’s ankle bone sits slightly higher than the fibula’s. This asymmetry is critical and shows up in almost every foot angle.
The midfoot. This contains the tarsal bones and creates the arch. The medial (inner) side curves upward; the lateral (outer) side is closer to the ground. This gives the foot its characteristic shape when viewed from the front or back.
The forefoot and toes. The metatarsals connect to the phalanges (toe bones). The big toe has two phalanges while the other toes have three. More importantly for drawing: the toes spread slightly outward from the second toe, and the big toe angles inward.
Think of it this way: the Achilles tendon connects the calf muscle to the heel bone from behind, the plantar arch supports the sole, and the instep is the raised area on top of the midfoot. You don’t need to draw these structures — but understanding them helps you draw the shapes correctly.
The Simple Shapes Method
This is the method that changed everything for me. Instead of trying to draw a foot as one complex shape, you break it into three simple geometric forms. Most professional artists use some version of this approach.
Here’s the breakdown:
Shape 1: The Heel Box. Draw a rounded rectangle or box shape for the heel. This is where the ankle sits on top. The back of this shape has the heel bump, and the top connects to the leg. Keep it relatively compact — the heel is smaller than you think.
Shape 2: The Midfoot Wedge. This connects to the front of the heel box and tapers toward the toes. Think of it as a wedge or tapered rectangle. The medial side curves inward (this is your arch). This section is longer than the heel but narrower than the toe area.
Shape 3: The Toe Triangle. Draw a triangle or fan shape at the front for the toes. The base of the triangle connects to the midfoot, and the point fans out to where the toes end. This is where you’ll place individual toe shapes later.
The key insight from GVAAT’s Workshop: “The foot has a rhythm from a narrow heel to a wide toe area.” Your shapes should reflect this gradual widening. The heel is compact, the midfoot expands slightly, and the toes spread to the widest point.
One more detail: the medial side (big toe side) is higher than the lateral side. When you’re drawing the foot from the front or back, the inner edge is higher than the outer edge. This creates a subtle tilt that makes feet look natural.
How to Draw Feet Step by Step
Now let’s put the shapes method into practice with a complete step-by-step process. This works for drawing feet from most angles.
Step 1: Draw the three basic shapes. Lightly sketch the heel box, midfoot wedge, and toe triangle. Keep your lines loose — you’ll refine later. Focus on getting the proportions right: the midfoot is the longest section, the heel is roughly one-third of the total foot length, and the toe area is about one-quarter.
Step 2: Add the arch. On the medial (inner) side, draw a curved line connecting the heel to the midfoot. This arch should be visible and creates the characteristic foot shape. The arch is highest near the middle of the foot and slopes down toward both the heel and toes.
Step 3: Mark the ankle bones. Place two small bumps on either side of the top of the heel box. The inner ankle bone (from the tibia) sits higher than the outer ankle bone (from the fibula). This asymmetry is one of the most important details for making feet look correct.
Step 4: Refine the silhouette. Using your basic shapes as a guide, draw the actual foot outline with organic, slightly curved lines. Add the heel bump at the back, the arch curve on the inner side, and the slight widening at the ball of the foot. Erase your construction lines.
Step 5: Place the toes. The big toe is a rounded shape on the inner side. The other four toes are smaller and spread slightly outward from the second toe. A common trick: draw a line from the base of the big toe to the base of the pinky toe — this angle helps with spacing. Toes aren’t perfectly aligned; they follow a slight curve.
Step 6: Add final details. Lightly indicate the Achilles tendon at the back, the ankle bone prominences, and any creases or wrinkles where the toes meet the foot. Keep these details subtle — they should support the form, not dominate it.
Common Mistakes That Make Feet Look Wrong
Here’s a troubleshooting guide for the most frequent problems. If your feet look weird, one of these is probably the cause.
Problem: Toes look like sausages.
Fix: Toes taper toward the tips. The big toe is slightly wider but still narrows. Draw them as rounded wedge shapes, not cylinders. Also, toes aren’t all the same length — the second toe is often slightly longer than the big toe.
Problem: The foot looks flat.
Fix: You’re probably ignoring the arch and the 3D form. When drawing from the front or back, show the arch on the medial side. When drawing from the side, show the curve from heel to toe along the bottom. Feet have volume — they’re not flat shapes.
Problem: Toes are too evenly spaced.
Fix: Toes have gaps between them, but they also cluster. The big toe and second toe are closer together; the outer toes have slightly more space. When toes are together (like in shoes), they form a compact wedge shape, not a straight line.
Problem: The ankle looks wrong.
Fix: Make sure the inner ankle bone is higher than the outer one. Also, the ankle isn’t centered directly above the heel — it’s slightly forward. This creates a natural lean that makes the foot look grounded.
Problem: The foot looks like a blob.
Fix: You’re drawing the outline without understanding the structure underneath. Go back to the three-shape method. Each section of the foot has a distinct form — heel box, midfoot wedge, toe triangle. Understanding these shapes prevents the blob effect.
Problem: Proportions feel off.
Fix: The foot is roughly as long as the forearm from wrist to elbow. In a standing figure, the foot is about one-sixth of the total height. When drawing a foot by itself, the toes take up about one-quarter of the total length, and the heel is roughly one-third.
Drawing Feet from Different Angles
Once you’ve mastered the basic foot from the side, learning other angles becomes much easier. Here’s what changes with each view.
Front view: You see the arch on the medial side clearly. The toes spread slightly from the center. The ankle bones are visible on either side, with the inner one higher. The instep (top of the midfoot) is prominently visible.
Side view: This is the most common beginner angle. You see the full arch underneath, the heel bump at the back, and the toes as small rounded shapes at the front. The ankle sits slightly forward from the center of the heel.
Back view: Similar to the front view, but you see the Achilles tendon clearly and the heel bump is prominent. The arch is on the medial (inner) side, and the ankle bones are still visible at different heights.
Three-quarter view: This combines elements of front and side views. One side of the foot is more visible than the other. The key challenge is foreshortening — the far side of the foot appears compressed. Use your basic shapes to maintain the structure even when parts are foreshortened.
Above view (looking down): You see the instep prominently. The toes appear shorter due to foreshortening. The arch is visible on the medial side. This angle is common when drawing seated characters with their feet visible from above.
Quick Tips for Drawing Shoes Over Feet
Drawing shoes is a common struggle. The key is understanding that shoes follow the foot’s structure underneath — they’re not separate shapes floating around.
Start by drawing the foot first, even if it will be hidden by the shoe. This ensures the shoe has correct proportions and perspective. Then draw the shoe over the foot, using the foot’s landmarks as guides.
The sole of the shoe follows the foot’s arch. The toe box of the shoe mirrors the toe area shape. The heel counter (back of the shoe) wraps around the heel box. When the shoe bends at the ball of the foot, it creates creases that tell you where the foot is flexing.
One tip from Clip Studio TIPS: “To draw shoes, we can start with the sole. It’s not necessary to sketch the toes if they are hidden.” This is helpful for boots and closed shoes — focus on the sole shape and the shoe’s overall silhouette rather than trying to show every foot detail underneath.
Practice Exercises to Improve
Consistent practice is how you get comfortable drawing feet. Here are exercises that actually help.
Draw your own feet. Take off your shoes, sit comfortably, and sketch your feet from different angles. You have a free reference model available anytime. Spend 5-10 minutes on each angle — front, side, back, and three-quarter view.
The 100 feet challenge. Draw 100 feet from references over the course of a week or two. Don’t worry about making each one perfect — focus on speed and consistency. By the end, the basic shapes will feel natural.
Gesture sketches. Use a timer (30 seconds to 2 minutes) and draw feet from quick photo references. This builds your ability to capture the essential shapes without overthinking details.
Copy masters. Study how professional artists draw feet — look at comic artists, animation artists, and classical figure drawing. Break down their approach and try to replicate their methods.
As one Reddit artist advised: “Keep those pencil strokes light till you got 100% confidence, build with simple shapes.” This applies to practice too — keep your early sketches loose and build up gradually.
Frequently Asked Questions
Are feet the hardest body part to draw?
Feet are widely considered one of the hardest body parts to draw, right alongside hands. The difficulty comes from their complex 3D structure, multiple joints, and the fact that they change shape significantly depending on the angle and weight distribution. However, with the simple shapes method and consistent practice, feet become much more manageable.
How to draw feet correctly?
To draw feet correctly, break the foot into three basic shapes: a heel box, a midfoot wedge, and a toe triangle. Establish the arch on the medial (inner) side, mark the ankle bones with the inner one higher than the outer one, then refine the silhouette with organic lines before adding toes and details. Always start with loose construction lines and commit to details only after the proportions are correct.
How to draw toes that look right?
To draw toes that look right, remember they taper toward the tips and aren’t all the same length. The big toe is a rounded wedge shape, and the second toe is often slightly longer. Toes follow a slight curve when viewed from above, and they cluster closer together at the big toe side. Draw them as simple rounded shapes first before adding individual details like nails or creases.
Why do my foot drawings look weird?
Foot drawings usually look weird because of one of these issues: treating the foot as a single shape instead of three distinct sections, ignoring the arch on the medial side, placing the ankle bones at the same height, or adding too much detail before establishing the basic proportions. Go back to the three-shape method and focus on getting the structure right first.
How to draw feet from the front?
When drawing feet from the front, you see the arch clearly on the medial (inner) side, the toes spread slightly from center, and the ankle bones visible at different heights on either side. The instep (top of the midfoot) is prominent. Start with the three basic shapes, then add the arch curve and ankle bone positions before refining the outline and placing toes.
Final Thoughts
Learning how to draw feet without them looking weird comes down to one core idea: simplify before you detail. Break the foot into three basic shapes, get the proportions and landmarks right (especially the ankle bones and arch), then refine with organic lines before adding toes and texture.
It takes practice — plan on drawing dozens of feet before it feels natural. But every artist who draws figures well went through this same process. Start with the simple shapes method, draw from references (your own feet are perfect for this), and keep your pencil strokes light until you’re confident in the structure.
Now grab your sketchbook and draw some feet. They won’t look weird forever.