
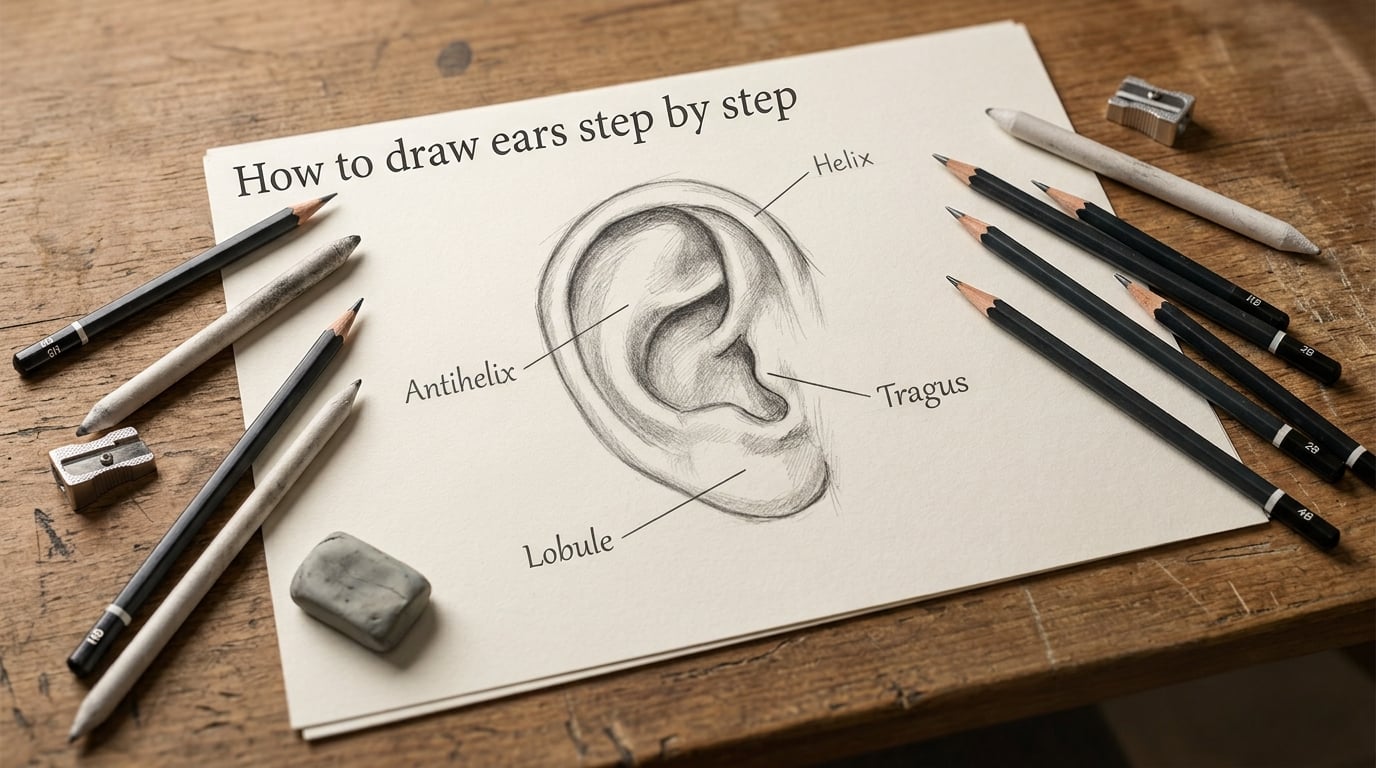
Ears are one of the trickiest parts of the human face to draw. They have so many curves, bumps, and shadows that beginners often skip them entirely or settle for a vague C-shape that looks nothing like the real thing.
Learning how to draw ears step by step transforms this frustration into a skill you can actually use. Once you understand the basic anatomy and follow a clear process, ears become far less intimidating than they first appear.
This guide walks you through ear anatomy, placement on the head, a 6-step drawing tutorial, shading techniques, and common mistakes to avoid. Whether you are a complete beginner or looking to sharpen your portrait skills, you will find a method that works for you.
Table of Contents
Ear Anatomy: Understanding the Parts
Before you pick up your pencil, you need to know what you are drawing. An ear is not just a random blob – it has specific parts with names, and each one plays a role in making your drawing look realistic.
The helix is the outer rim that curves from the top of the ear down to the lobe. Think of it as the thick C-shaped border that gives the ear its overall silhouette.
Inside the helix sits the antihelix, a Y-shaped ridge that runs parallel to the outer rim. The antihelix splits into two branches near the top – this Y-shape is one of the most important features to capture.
Below the antihelix, a small flap called the tragus partially covers the ear canal. Opposite the tragus on the other side of the ear opening is the antitragus, a smaller bump that separates the canal from the lobe.
The large hollow area behind the tragus is the concha – this bowl-shaped depression is the deepest part of the ear. And at the bottom, the lobule (earlobe) is the soft, fleshy piece that varies widely in size and shape from person to person.
Do not worry about memorizing every term right now. As you work through the steps below, these names will become second nature because you will actually be drawing each part.
What You Need: Materials and Setup
You do not need expensive supplies to draw a good ear. A standard HB pencil for initial outlines and a 2B or 4B pencil for shading will cover most of your needs.
Grab a kneaded eraser for lifting highlights and cleaning edges, and a blending stump or tortillon for smooth tonal transitions. Regular sketch paper works fine – anything too glossy will not hold graphite well.
One tip that often gets overlooked: control your pencil pressure. Light, gentle strokes for the initial construction lines let you erase and adjust easily. Save heavier pressure for the final dark areas in the concha and shadow zones.
Where Ears Go on the Head
This is a question beginners ask constantly, and getting it wrong makes even a well-drawn ear look off. Here is the rule: ears sit between the eyebrow line and the bottom of the nose.
Imagine two horizontal lines across the face – one at the eyebrows, one at the base of the nose. The top of the ear aligns roughly with the eyebrow line, and the bottom of the earlobe sits near the nose line. This holds true for front and side views.
When the head tilts, the ears tilt with it. A common mistake is drawing ears perfectly vertical while the head is angled. Always match the ear’s angle to the head’s angle.
For side views, the ear sits well behind the center line of the head. It does not stick out as far as beginners tend to place it – pull it back closer to the skull and you will get more realistic proportions immediately.
How to Draw Ears Step by Step: The 6-Step Tutorial
This is the core of the tutorial. Follow each step in order and resist the urge to skip ahead to shading before the structure is solid.
Step 1: Draw the Outer Shape
Start with a loose oval or egg shape tilted slightly forward at the top. This is your construction foundation – it represents the overall ear silhouette. Keep your lines light so you can adjust later. The top of the oval should be narrower than the bottom.
Step 2: Add the Helix (Outer Rim)
Draw a curved line inside the oval that follows the outer edge but does not touch it everywhere. The helix thickens as it comes down toward the lobe. Leave a small gap between your helix line and the outer oval at the top – this creates the folded-over look of the upper ear rim.
Step 3: Draw the Antihelix Y-Shape
Inside the helix, sketch a Y-shaped line. The bottom of the Y starts near the middle of the ear and branches upward into two arms that nearly reach the top rim. This Y-shape is the single most important landmark inside the ear. Get this right and the rest falls into place.
Step 4: Add the Tragus and Ear Canal
On the inner side of the ear (near the face), draw a small rounded flap pointing inward – this is the tragus. Behind and below it, sketch a small oval or dark area representing the ear canal opening. The antitragus is a small bump directly across from the tragus on the lower inner edge.
Step 5: Define the Earlobe and Concha
Connect the bottom of the helix down to form the earlobe. The lobe can be attached (connected to the face at the bottom) or detached (free-hanging) – check your reference photo. Draw the concha as the large open space between the antihelix, tragus, and antitragus.
Step 6: Refine and Clean Up
Erase your original oval construction line. Smooth out any jagged edges. Add small irregular bumps along the helix – real ears are not perfectly smooth. Darken the ear canal opening and the deepest fold of the concha to start creating depth.
The Easiest Way to Draw an Ear (3 Lines Method)
If the full 6-step process feels overwhelming, try this ultra-simplified version. It works especially well for quick sketches, cartoon styles, or when you just need to block in an ear on a face fast.
Start with an oval. Then draw three curved lines inside it: one for the outer rim (helix), one diagonal line for the antihelix, and a short curved line for the tragus. That is it – three lines inside an oval, and you have a recognizable ear.
This method will not give you photorealism, but it builds confidence and trains your hand to remember the basic proportions. Many artists on Reddit’s r/learntodraw community report that this simplified approach is what finally made ears click for them.
Shading Your Ear Drawing
Shading is where a flat outline transforms into a three-dimensional form. The most important rule: pick one light source direction and stick with it.
Imagine light coming from the upper left. The areas that face the light (outer rim, top of the antihelix) stay lighter. The areas that face away from the light (deep concha, under the helix fold, behind the tragus) go darker.
Start by mapping the darkest shadows – the ear canal opening, the deepest part of the concha, and the fold where the helix meets the antihelix. Use your 4B pencil with moderate pressure for these areas.
Next, fill in mid-tones across the antihelix and the inner surface of the helix using your 2B pencil. Blend gently with a blending stump for smooth transitions.
Finally, use your kneaded eraser to lift out highlights along the top edge of the helix and the ridge of the antihelix where light hits directly. This contrast between light and shadow is what gives the ear its 3D depth.
A common reason ears look flat is skipping this tonal mapping. Reddit’s r/ClipStudio community calls this “shadow mapping,” and many artists say it was the breakthrough concept that made ears finally work in their drawings.
Drawing Ears from Different Angles
The side view is the most common angle for ear tutorials, but real portraits show ears from many perspectives. Here is how to adapt.
Front view: The ear appears much narrower because you are seeing it almost edge-on. The helix creates a strong C-shaped outline, and the interior details compress. You see less of the concha and more of the helix rim.
Three-quarter view: This is the sweet spot where ears look their best. You see the full depth of the ear, the Y-shape of the antihelix is clearly visible, and the concha creates a nice shadow pocket. Most portrait drawings use this angle.
Back view: The helix becomes the dominant feature, with the rest of the ear hidden. Draw the helix as a thick curved ridge and indicate the antihelix behind it with subtle shading.
For any angle, always start with the oval construction shape and adjust its tilt to match the head’s position. The anatomy stays the same – only the perspective changes.
Common Mistakes and How to Fix Them
Every beginner makes these errors. Recognizing them early saves you weeks of frustration.
Making the ear too flat. If your ear looks like a sticker pasted onto the head, you are likely skipping the shading step or using uniform tones. Fix it by pushing your darks darker in the concha and ear canal. The contrast creates depth.
Placing the ear too high or too far forward. Use the eyebrow-to-nose guideline every time. If it still looks wrong, check whether the ear is too large relative to the eye and nose – ears are roughly the same height as the distance from eyebrow to chin.
Over-detailing too early. Beginners often zoom into tiny wrinkles and textures before the overall shape is correct. Get the silhouette right first, then the major landmarks, and only then add fine details.
Ignoring the light source. Random shading without a consistent direction makes the ear look lumpy. Commit to one light direction before you shade anything.
Using the same pencil pressure everywhere. Vary your pressure to create a range of values. Light construction lines, medium mid-tones, and firm pressure only for the darkest shadows in the ear canal.
Stylized Ears: Anime, Cartoon, and Elf Variations
Once you understand realistic ear anatomy, stylizing becomes much easier. Cartoon and anime ears simplify the same landmarks into fewer lines.
Anime ears typically reduce the ear to a simple pointed or rounded shape with just the helix and a hint of the antihelix visible. The concha and tragus are often omitted entirely or suggested with a single short line.
Elf ears extend the helix upward into a long point while keeping the base shape similar to a normal ear. The internal structure stays minimal – usually just the helix outline and a small inner line for the antihelix.
The key is that stylized ears still follow the same basic proportions and placement rules. A cartoon ear in the wrong spot on the head looks just as wrong as a realistic one.
Practice Challenge: The 20-Ear Study
The single best way to improve at drawing ears is volume practice. Here is a challenge that artists on r/learntodraw swear by: draw 20 ears from reference photos in one sitting.
Do not aim for perfection on each one. Spend two to three minutes per ear, focusing on getting the proportions and landmarks right. Use photos of different people – different ages, angles, and lighting conditions.
By ear number ten, you will notice your hand starting to remember the Y-shape and helix curve without conscious effort. By ear twenty, the basic structure will feel natural. This kind of repetition is how real skill develops.
Frequently Asked Questions
How can I draw an ear diagram easily?
Start with an oval shape, then draw a curved line for the outer rim (helix), a Y-shape inside for the antihelix, a small flap for the tragus, and connect the bottom for the earlobe. This five-element framework creates a recognizable ear diagram quickly.
What are the basic shapes for drawing ears?
The ear uses three core shapes: an oval for the overall form, a C-curve for the outer rim (helix), and a Y-shape for the inner ridge (antihelix). Everything else – the tragus, concha, and lobe – builds from these three foundations.
How do you draw realistic ears on a face?
Place the ear between the eyebrow line and the bottom of the nose. Match the ear’s tilt to the head’s angle. Then add consistent shading from a single light source to create three-dimensional depth. Realistic ears require accurate placement as much as detailed drawing.
What are some tips for drawing ears?
Start with light construction lines so you can adjust easily. Learn the Y-shape of the antihelix – it is the most important interior landmark. Use a single light direction for shading, and draw 20 ears from reference photos to build muscle memory quickly.
How do you draw an ear easily for beginners?
Use the 3-line method: draw an oval, then add three curved lines inside it for the helix, antihelix, and tragus. This simplified approach creates a recognizable ear with minimal effort and builds confidence before attempting more detailed anatomy.
What is the hardest body part to draw?
Ears are widely considered one of the hardest body parts to draw because of their complex curves, overlapping folds, and subtle shading. Many artists on forums report avoiding ears for months before learning a simplified method that finally worked.
How do you draw ears easy anime style?
Anime ears simplify the anatomy to a pointed or rounded shape with just the helix outline and a small inner line. Keep the ear placed between the eyebrow and nose line. Skip the tragus and concha details – anime style relies on clean, minimal lines.
Conclusion
Learning how to draw ears step by step comes down to understanding a few key landmarks – the helix, antihelix Y-shape, tragus, and lobe – and placing them correctly between the eyebrow and nose lines on the head.
Start with the simplified oval-and-three-lines method if you are a beginner, then work up to the full 6-step tutorial for more detailed results. Add shading from a consistent light source to push your ears from flat outlines into realistic, three-dimensional forms.
The 20-ear practice challenge is the fastest path to improvement. Pick up your pencil, grab some reference photos, and start drawing – you will be surprised how quickly the structure becomes second nature.